
Recently my friend and I were toying with this because I wanted to be able to play some games and only had Mac’s at my house.
After a lot of googling and trial and error he gave me access to Unraid and I went to work on trying to find out what was going on – hopefully this blog will help others trying to achieve the same result.
Thanks very much to https://www.reddit.com/user/Kemaro for the original write up on this.
Getting the GPU Dump User Script
First of all – before getting started you need to install the User Scripts Plugin in Unraid. Once the User Script plugin has been installed then you will also need the GPU Dump script from here https://github.com/SpaceinvaderOne/Dump_GPU_vBIOS Make sure you add this as a user script and follow the instructions for dumping your cards VBIOS.
Establish Windows 10 VM
Now – you’ll also need a Windows 10 VM as well. Create it initially with just the VNC driver as the primary GPU, don’t pass through the second GPU yet.
Once loaded up, make sure that you install the VIRTIO drivers. Update windows.
Enable a program like teamviewer or RDP so you can access the VM without using Unraid’s browser VNC
Unraid Configuration Changes
Next – in Unraid go to Tools and then System devices. Make sure you tick all the devices that are your graphics card in the IOMMU group – then press “BIND SELECTED TO VFIO AT BOOT” Ours was done like this – as you can see its not simply just the graphics card its also the audio controller on the card and USB controllers.

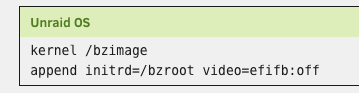
Before you reboot unraid, go and click on the Flash drive under Main and add the following at the end of the second line in the Unraid OS Section
video=efifb:off
It should look like this
Go ahead now and reboot Unraid.
Configuring the VM Part 2
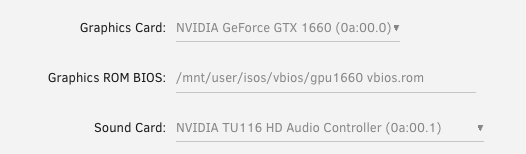
This is the key missing component from most guides I’ve seen. The next thing we need to do is pass through our GPU. We need to select the rom file as well and then also pass through the other devices related to the GPU as well.
In our example we had the following devices to passthrough:
As well as

Don’t start the VM yet, simply update the config.
Updating the VM Part 3
The last step we need to take is edit the VM one more time, however this time we want to click the toggle that says “Form View” so we can see the XML view of the machine.
In the original guide I read it said to find the hardware code, in our XML that didn’t exist however we were able to find out where the GPU is referenced as the hostdev section as it mentioned the GPU VBIOS ROM file we specified. In this line we need to look for the line that references the bus that is uses
In our case this was the lines:
<hostdev mode='subsystem' type='pci' managed='yes'>
      <driver name='vfio'/>
      <source>
        <address domain='0x0000' bus='0x0a' slot='0x00' function='0x0'/>
      </source>
      <alias name='hostdev0'/>
      <rom file='/mnt/user/isos/vbios/gpu1660 vbios.rom'/>
      <address type='pci' domain='0x0000' bus='0x0a' slot='0x06' function='0x0'/>
    </hostdev>
The line that says bus =’0x0a’ is what we are after. We need to edit the other devices after this in our XML config to also be on the same bus. So go through and change the lines for the other hostdev entries after the Video card entry to match the bus entry to be the same (i.e all the other devices should also say bus = ‘0x0a’ as opposed to whatever the VM has preconfigured.
Once you’ve done this – save the config.
Cross your fingers and start the VM
All going well, this should allow the VM to boot without error. Now though – you’ll need to access it via RDP or Teamviewer, whatever you decided on earlier and you can install the video card drivers.
Errors you might come across
If you have an existing VM image you’ve been trying this on – first you should go back to basics and just use the VNC driver, to then use DDU (https://www.guru3d.com/files-details/display-driver-uninstaller-download.html to completely remove the GPU driver if you had tried to install it earlier. If you don’t you’ll likely boot to a black screen even if everything else has been done correctly.
If you see an error like the one below:
can't reserve [mem 0xd0000000-0xdfffffff 64bit pref] unraidThen refer above to appending video=efifb:off to your boot config.
If you fully break everything like we did multiple times – remember as long as you have physical access to Unraid you can change things like the boot config by looking at the config folder on another computer and then hopefully be able to boot back up.
If this thread was helpful for you please consider donating
Bitcoin: 14322nah4Jv6SRheoBN1KS8jemuPVhHc88
Ethereum: 0x7c6e97e80d66bfe74a70d763a0a5617890dc6463
Or via osko in Australia send to donnie@up.me